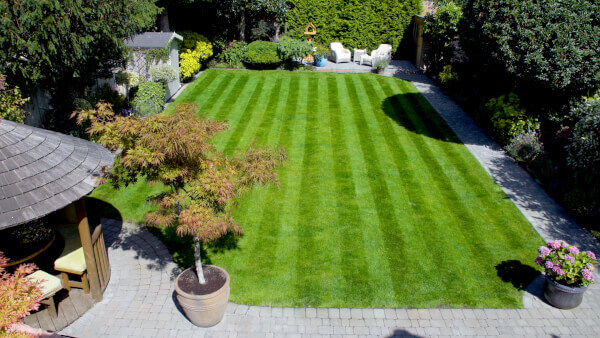
There’s nothing we love more at Hayter than a perfect striped lawn. An enduring symbol of British charm and class, a well-striped lawn can turn a strip of grass from an afterthought into a centrepiece or add the perfect finishing touches to your home and garden.
For over 75 years, we’ve made it our priority to create the finest mowing machines, designed to make it easy to get the perfect lawn. Our mowers have been used in both personal and commercial projects for many years – but if you’re new to our mowers you can follow this guide to get the perfect striped lawn.
How do you get lawn stripes?
A striped lawn occurs when you mow your lawn in an up/down pattern. The grass within each stripe is pressed over to follow the direction of travel, meaning that each blade of grass lays at the opposite angle to each blade within the adjacent stripe. This creates what is known as the ‘nap’. Each alternating stripe of grass reflects the light differently, which creates the classic striped look.
In order to create the nap, you’ll need a mower with a rear roller – or you’ll have to invest in a striping kit for your existing mower. Thankfully, the entire range of Hayter mowers now feature a rear roller, so it’s never been easier to get those perfect lawn stripes.
Prepping your lawn
To get the best possible lawn stripes, it’s important that you prep your grass. Be restrained when maintaining your grass in the lead-up to striping; don’t cut too short. Longer blades of grass tend to stand taller, adding extra definition to your stripes.
If it’s your first time, it’s worth thinking about exactly how your stripes will look like before you start cutting – are you going horizontal or vertical? Not every garden is shaped in a perfect square or rectangle, so consider any awkward corners or obstacles you might have to face when mowing.
But remember, stripes don’t necessarily need to be straight or follow the layout of your garden. The style and direction of your stripes can influence your garden’s aesthetics and create the illusion of distance and space.
Mower preparation is also a key element of the prep process. Ensuring the cutter blade is sharp and running at its optimum speed maintains a clean cut, helping reduce the risk of grass disease. A sharp blade also helps prevent damaging the tip of the freshly cut grass, which could lead to unsightly yellow or brown tips on your grass.
Mowing your stripes
To get started, ensure you’re at a right angle to the garden’s perimeter, using a fence or another stationary object as a reference point. Mow right up to the edges of your garden, taking care to maintain a consistent, steady line as best as possible.
Always remember to cut no more than 1/3rd off your grass at one time. When you reach the end of the run, turn 180 degrees and turn back to mow your next stripe the opposite way, adjacent to your previous stripe.
We’d recommend overlapping your stripes ever-so-slightly to ensure there aren’t any patchy areas missed when striping – but don’t overlap too much if you want your stripes to be even widths! The width of the front wheels is a typical reference point, which can be used to ensure the uniformity of your lawn stripes.
Once you have finished creating your striped effect, the next step is to tidy up the areas where you have turned the mower. If you have a patio or area of run-off where you can turn the mower you’ll be able to maintain the stripe all the way to the edge of the lawn. If turning on the lawn however, we would recommend going around the perimeter of the entire lawn once or twice (in alternating directions) to improve presentation. This is called the ‘headland’ and inherits the term from agricultural farming.
When finished, walking across your lawn in the direction of the nap helps preserve the striped finish.
It is also recommended to occasionally alternate the direction of stripes to help prevent the build-up of thatch and help prevent against disease. Helping prevent thatch enables water and nutrients to access the soil and the root zone of the grass, helping maintain a healthy, lush lawn.
If you’re using the right Hayter mower for your garden, the width of your mower should provide a perfectly-sized width of cut. We have a vast range of different models with a variety of different cut widths so you can find the right one for your garden. Whether you’re looking for a petrol or electric mower, we’ve got the perfect mower for you.


